Graphics by

Tuesday, April 17, 2012

Personal Narrative Project

I LOVE teaching 7 & 8 year old children about the writing process.  Some of my mentors are Regie Routman, Katie Wood Ray, Ralph Fletcher, Lynne R. Dorfman, Rose Cappelli and Lucy Caulkins, to name a few.  So...when I recieved my February, 2012 issue of The Reading Teacher and read the article Combining Traditional and New Literacies in a 21st Century Writing Workshop by Jennifer M. Bogard and Mary C. McMackin I added them to my "mentor" list and jumped in feet first to try my hand at integrating easy to use technology into the stages of writing.

WOW!  What a fascinating process.  I am so thankful their article was published! Throughout the month of March my second grade students participated in a Slice of Life writing challenge.  This provided students with several snippets of their life to choose from when selecting a writing topic for a personal narrative story.

Bogard and McMackin suggested a 5-step process for writing a narrative story in their article.  This is what that process looked like for us.

Step 1: Planning

Anyone who has worked with young children knows they do not spend much time planning what to write!  Typically they think of an idea and get down to business.  Bogard and McMackin suggested that you begin this process by having students map out key points of their stories using a graphic organizer.  Here is the organizer I made for my students. Graphics are from Scrappindoodles and DJ Inkers.
Story Map

Step 2: Developing Stories Through Recorded Oral Rehearsal


How come I never thought of this!  Such a wonderful idea.  It really helped students remember and add so much more detail to their writing!  Second graders made short videos of themselves telling their stories using Glogster EDU.  They have worked with Glogster EDU independently so this went fairly quickly.  As always, we had a few technical difficulties, but overall it only took us a couple of days to get everyone recorded.  


Step 3: Listening, Critically Thinking and Conferring


After the children recorded their stories they listened to themselves and wrote their stories out on paper.  We finished this just before heading off for Spring Break.  Perfect timing if you ask me!  A week away from their stories did wonders for their editing.


Upon our return to school we worked on adding details with our writing partners.  Students practiced adding details through questioning.  A strategy taken from Mentor Texts: Teaching Writing Through Children's Literature, K-6 by Lynne R. Dorfman & Rose Cappelli.  As we continued to write we focused on word choice; thinking about making use of special vocabularies we have under our belts. Leads; making them more interesting using mentor texts.  And endings; working hard to compose satisfying endings for our audiences.


Throughout these lessons I continuously referred to our Writing Process chart to remind students that we can move back and forth through the process until we decide to finally publish for our intended audience.
This is the chart we use to remind ourselves of the writing process and how it works.
Narrative Project Checklist


Step 4: Creating Storyboards

Once students completed our checklist they were ready to create their storyboards.  Throughout the entire process I modeled each step with a story that I was writing along with them.  A few students had trouble deciding where their text should end for one slide and begin for the next.  A little extra 1:1 time in this department was helpful for them.


Here you can see students using their planning sheets to organize their stories.


Step 5: Creating Digital Stories

This was one of the most exciting parts of the entire process!  The kids loved recording themselves as well as listening to themselves reading aloud.  It has done wonders for their editing, fluency (expression & prosody) and self esteem.  We used Photo Story 3 which is a free download for PC's and super easy to use.  The video will work best if you make sure all the photos you use and the finished photo story are saved in the same file.  To avoid technical difficulties I went ahead and created each photo story on my computer rather than have the kids try to do it independently on their Mini Dells.  Next year I will start this process earlier in the year and hopefully have time to teach the kiddos how to upload their own photos and create a photo story independently.  I can't wait to get them all finished and published on our classroom website.  Here is a sample of one students finished product.  I uploaded the photo story to Youtube in order to embed it into my blog.

Wednesday, April 11, 2012

Dinosaurs, Dinosaurs, Dinosaurs!

     It is all about Dinosaurs this month in my second grade classroom.  Rawrrrrrrrrrrr!  Our unit began right after we returned from Spring Break.  I introduced the unit with a very sorry looking "egg" made out of a brown paper bag (I just can't bring myself to paper mache anymore).  Inside was a triceratops puppet.  We had done some inferring previously during our read alouds, but I think we need to keep working on that strategy (as you can see from some of their answers after each clue). 


The idea for this chart was inspired by one Deanna Jump posted on her blog.


     After discovering our unit of study we dove into it by reading Professor Potts' book, Uneversaurus.  This is an excellent book that explains how we know what dinosaurs looked like even though no human has ever seen one.  After reading the book we used our imaginations, bubble wrap, white butcher paper, sponge rollers and yellow, magenta, turquoise and black Crayola tempera paint to mix colors and create our own dinosaur skin.  The kids loved this!  We then traced one of three dinosaur patterns onto our skin to create our own version of a dinosaur.


     This week we are also learning about fossils and did a mini dinosaur dig in the classroom.  Again, my students LOVED this!  A couple of years ago I found a great replica of a T-Rex skeleton at Costco of all places.  I layered the "fossils" in a clear tote with potting soil and let these budding scientists have at it.  My class is small this year (15 cutie pies) and two were absent today so I broke them into 3 groups.  We had "diggers," "recorders," and "washers."  Each group rotated through each job.  In order to give everyone a chance to discover a fossil I had to stay on top of the rotation of the first two groups.  By the third group they were on their own.  I love standing back and watching kids discover and learn without me in the way.  The "washsers" started trying to figure out how to assemble the pieces.  They kept encouraging the "diggers" to keep digging for fossils they thought they still needed.  Then there was a whole conversation between the "recorders" about how archeologists don't always find all the bones they need to assemble the skeleton.


     It was pretty exciting...to say the least.  Stay tuned for more of our dino discoveries.


Friday, April 6, 2012

Smilebox

     I have been experimenting with various slideshow programs recently.  Here is a slideshow I made using Smilebox.  They give you a lot of choices with their free subscription.  I have also used Animoto and like it when I don't want to put very much text.  It took me about 5 minutes to make this slideshow.  Most of my time was spent choosing which photos I wanted to use.


Click to play this Smilebox slideshow
Create your own slideshow - Powered by Smilebox
A slideshow design by Smilebox

Sunday, April 1, 2012

Homemade Finger Paints

We have been on Spring Break this week and I have finally had some time to explore the homemade art recipes from the PreKinders Blog . On Thursday my 3 and 6 year old sons helped me make some homemade finger paints. We had a lot of fun and couldn't believe how cool the colors turned out!  Here are some pictures and some insights we had while making the paints.


Here we are mixing the flour and cold water together.  It took a little time to get all the lumps out.


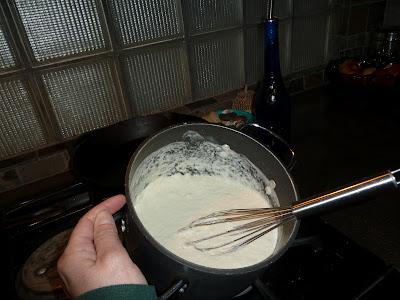
As the flour and water began to heat up on the stove it got pretty lumpy.  I thought I had ruined the recipe but it was just the beginning of the solution coming together to make a thick paste.  The recipe said to keep stirring until the paste became clear.  Eventually my arm got tired from stirring the thick paste so ours ended up opaque rather than clear.  

We divided up the paste and then did some color mixing with Schilling Neon Food Coloring.  The boys LOVED this part!


Here are the paints we made.  We had enough for 7 different colors, but I ran out of plastic containers.  I purchased the containers at the Dollar Tree and they came with lids which was handy.


Here are the artists at work and some of the finished products.  We painted on white construction paper and let our paintings dry over night.  The paper curled quite a bit on the paintings that had "thick" applications.  We put them under heavy books to flatten them out.  Next time we get the paints out we will paint on poster board.  The paints dry with a glossy sheen which we liked very much.  After 3 days the paints were still usable.