Graphics by

Saturday, October 6, 2012

Writing Prompts and Sentences

Last week a good friend of mine posted on Facebook that it was International Book Week and that I should grab the nearest book, turn to page 52 and record the 5th sentence on the page as my next post.  I loved the idea and tried it out.  I got addicted to the idea and proceeded to go through my bookshelf, turn to page 52 of each book and read the 5th sentence on the page.  In the middle of this frenzy it occurred to me that this could be an awesome way to come up with writing prompts and reinforce the idea of a sentence for my second graders!

My sweet little workaholics had been asking me for homework for several days (we are still in the honeymoon phase) so I made their wish my demand this week and created a homework packet that they could work on throughout the following week.  It included reading, spelling, math and writing activities.  For writing I gave them a similar assignment to the one my friend gave me. I asked them to collect 10 reading materials from around their house.  It could be books, magazines, newspapers, cookbooks, you name it.  They had to turn to page 5 and record the 3rd sentence.  My plan is to use these sentences as future writing prompts and homework assignments.  

Here are some of their "found" sentences.


Graphics by DJ Inkers @ djinkers.com

This is a secret between you and me.

"No electric blankets."

Rainbow Shiner, lookin' sharp.

"Why don't you go play with squirrel?

"Aha!"

The hard, woody stem is called a tree trunk.

The black widow is one of the few North American spiders whose bite can hurt humans.

I think they will make for some great writing prompts...

And just a little aside, I looked up International Book Week because another friend of mine questioned whether or not this was legitimate.  It turns out you can host "International Book Week" whenever you want...there is no designated week. :)

Monday, September 24, 2012

Teaching Conventions

This year in my second grade classroom we are beginning the day with a Morning Meeting.  We greet each other, go over our schedule, share and read a morning message.  During the first two weeks of school we just focused on the message.  During the 3rd and 4th week we started looking at the parts of the message that I always include (date, greeting, message, closing, signature).  This week I started leaving out punctuation, misspelling words, etc.  I ask students to read the message first and then tell me something I did WELL.  This was DIFFICULT in the beginning.  The mistakes are the first things they see and want to tell me about.  However, I feel strongly that we need to first look at what the writer has done well and then talk about the places the writer can improve.  After we share about all the things I have done well we begin to look at the areas I need to fix.  When a student comes up to show me what to fix I let them fix my problem and then ask them to explain why I should do this.

Student: "You didn't put capital letters at the beginning of your name."
Me: "Why should I do that?"
Student: "Because you always start a persons name with capital letters."
Me: "Oh, I see.  Thank you for teaching me that!"

This is something my students have discussed in kindergarten,  first grade and now in second grade.  I have never taught conventions this way, but wonder "WHY IN THE WORLD HAVEN'T I?"  I love the way this is reinforcing conventions and their importance and that the children are being empowered by helping and teaching me why I should use the conventions.  I am excited to see how this transfers to their own writing.  I will keep you posted.

Do you have any other ideas for teaching conventions in second grade?  I would LOVE to hear them.

Sunday, July 22, 2012

I (Heart) Wordnik

When teaching students new reading strategies I like to authentically highlight and model how I use these strategies as a reader myself.  A few years ago my father-in-law sent my husband a subscription to the Wall Street Journal for his birthday.  The financial section, among others, has been a gold mind for me when modeling comprehension strategies and using prior knowledge, context clues and dictionaries to figure out unknown vocabulary and make meaning of what I am reading.


Tonight I discovered a new "dictionary" tool, Wordnik.  Wordnik is an online dictionary focused on how words are used today.  


I love the platform.  Simple.  You type your unknown vocabulary word into the search box and then click on the (I LOVE this part) "I ALWAYS FEEL LUCKY" button.

I was lucky each time I entered a vocabulary word tonight.  I received a straight forward definition (or 2 or 3) and several examples of how the word is used.


While I read the paper tonight I had my laptop open and within reach.  When I came across a word that needed some clarification I typed it into Wordnik and in the span of a few nanoseconds learned that a Charlatan was a person who makes elaborate, fraudulent claims, occluded was an adjective meaning closed or obstructed (I almost had this one with prior knowledge and context clues!) and that efficacy was the power or capacity to produce a desired effect.


I can't wait to introduce this tool to my second graders this fall!  


What kinds of online dictionaries do you use in the classroom?

Saturday, June 30, 2012

Revisiting Storybird

Tonight I came across a wonderful Blog called Kleinspiration.  The author, Erin Klein, recently had an article published in the Classroom 2.0 Book Project.  Her article, Digital Writer's Workshop, was about troubleshooting through collaboration and reflection when using digital writing tools in the classroom.  One of the tools she discussed using was Storybird.


I introduced Storybird to my second graders this year (click here and here for previous posts) and found they were really excited about creating stories using this tool in the beginning but that their excitement fizzled rather quickly.  Many of  my really motivated writers did not even complete their Storybird writing projects leading me to believe the tool wasn't appropriate for such young children.  After reading Erin's article I am newly inspired and ready to try again this coming fall.  She suggested having students write first and then use Storybird to publish.  When I introduced Storybird to my kiddos this past year they chose illustrations first and then tried to create a story based on those illustrations.  This was REALLY HARD for them because writing fiction is CHALLENGING for 7 and 8 year olds.  My students were also trying to create their stories using Mini Dells.  This was a challenge because the screens were so small!

My new plan is to introduce the website to my students at the beginning of the school year by showing them some stories that I have written and sharing my writing process (Erin's suggestion).  After we build up a collection of shared writing we will work together to publish a few of our writing pieces using Storybird. I have a feeling this is going to work much better. I will post in more detail once we begin our writing journey this fall!


Tuesday, June 26, 2012

Free Technology for Teachers

If you are looking for new and innovative ways to use technology in your classroom the Free Technology for Teachers blog written by Richard Bryne is a MUST SEE!  He is incredible.  I can hardly keep up with all of the wonderful things he has been sharing.  Sometimes he posts 5 times in one day!!!!!

Talk about making learning contagious!  After each post he briefly describes how the technology applies to education.  Below each post there are 4 additional links to other posts you might be interested in.

If you are using technology (and I really hope you are!) in the classroom you have now found your pot of gold at the end of the rainbow! 

Some of my favorites so far are:


Wednesday, June 13, 2012

Digital Observation Forms

I, like many of you, have been searching for a better way to contain all those observational notes I collect when conferring with students and share that information with our Title 1 and Special Education teachers for years.  Last year I tried using a "penseive" like the one the CAFE sisters suggest.  I thought it was the best thing since sliced bread in the beginning, but by the end of the school year I realized it wasn't the best tool for me.  I still wasn't able to communicate the way I wanted to with our Title 1 and Special Education teachers and I found the notebook to be a little cumbersome.

I was given an ipad to play with this summer by my school district and decided I would first use it as a teaching tool for me.  I created a conferring observation form for reading, math and writing using Google Forms.  I kept the forms as simple as possible.  Below is a sample of the Reading Observations form that I made.  I am keeping the form and all of my reading lesson plans on a private Google Site that I made for easy access while conferring.

The reason I think this is so wonderful is that each time I submit an observation it puts all the data into a spreadsheet.  I can view the data in several different ways: by student, strategy, books the student has read, etc.  Also, by sharing the form with my colleagues we can all enter our data while working with students and view it!  This will allow all of us to be on the same page with our struggling students...the information will be at the tip of our fingers. 

Tuesday, June 12, 2012

Summer Learning Opportunities

This summer I am posting to my classroom website on Tuesdays and Thursdays in an effort to keep those sweet second graders I had last year connected to learning over the summer. Before the last day of school I modeled and taught them how to comment on our classroom blog.  We talked about social media etiquette and what a great blog comment would look like.
Is what I am going to write true?
Is what I am going to write helpful?
Is what I am going to write interesting?
Is what I am going to write necessary?
Is what I am going to write kind?

If you click here you will see the first post of the summer and can follow the rest from there.  Last week was the first week we were out of school and I haven't had any students make a comment on any of the posts yet.  Hopefully that will change soon!  I am also recording the posts using Soundcloud for those little ones who might have a little trouble reading the entire post independently.

Graphics by DJ Inkers


Thursday, May 31, 2012

Student Led Conferences

WoW!  This year flew by!  It is hard to believe tomorrow is our last day of school, but it is.  We finished our student led conferences last week and in some ways have struggled a bit to stay focused during our last few days together.  One of the last things students shared with their parents during their conference was "Technology and Summer Learning Opportunities."  One of the options they have is to sign-up to our classroom blog via email to recieve posts from me on Tuesdays and Thursdays over the summer.  My hope is that we can continue to keep our learning community alive and well over the summer using technology.  In an effort to do this I taught my students how to comment on our classroom blog.  I modeled commenting for them and then we practiced. You can check out their comments and our classroom blog by clicking here.  Throughout the summer I plan to post fun, engaging activities that students can try at home.  I am hoping they will try some (if not all) of them and then comment on how the activity turned out. I also let them know they could email me any projects that they do and I will post them on the blog.

Here are a few pictures of our portfolios and the work that we shared during our conferences.


Students created "Wild & Calm" self portraits.  I got this great idea from Art Projects for Kids.


The first pocket has our agenda.  The math section is a "Show What You Know" piece.  Students do the math while their parents watch.  We review before the conference.  I find that some parents have a really hard time allowing their child to do this part without jumping in and taking over though.


This year we created Reading Posters using Glogster EDU. You can check them out by heading to our Classroom Blog and clicking on the "Student-Led Conference" tab at the top.


Next came our writing section.  This year I typed each students September and May writing samples and put them in the front.  I wanted parents to notice the growth their child had made in word choice, sentence structure and content before they looked at their child's spelling and conventions.  Sometimes it is hard to see past the errors.  Next I put the planning sheet from their personal narratives so parents could see the process their child went through to create the story.  Then students showed their published digital version of the story here.  Students also had a non-fiction research piece of writing about dinosaurs and all of the letters they wrote to their parents throughout the school year.


Tuesday, April 17, 2012

Personal Narrative Project

I LOVE teaching 7 & 8 year old children about the writing process.  Some of my mentors are Regie Routman, Katie Wood Ray, Ralph Fletcher, Lynne R. Dorfman, Rose Cappelli and Lucy Caulkins, to name a few.  So...when I recieved my February, 2012 issue of The Reading Teacher and read the article Combining Traditional and New Literacies in a 21st Century Writing Workshop by Jennifer M. Bogard and Mary C. McMackin I added them to my "mentor" list and jumped in feet first to try my hand at integrating easy to use technology into the stages of writing.

WOW!  What a fascinating process.  I am so thankful their article was published! Throughout the month of March my second grade students participated in a Slice of Life writing challenge.  This provided students with several snippets of their life to choose from when selecting a writing topic for a personal narrative story.

Bogard and McMackin suggested a 5-step process for writing a narrative story in their article.  This is what that process looked like for us.

Step 1: Planning

Anyone who has worked with young children knows they do not spend much time planning what to write!  Typically they think of an idea and get down to business.  Bogard and McMackin suggested that you begin this process by having students map out key points of their stories using a graphic organizer.  Here is the organizer I made for my students. Graphics are from Scrappindoodles and DJ Inkers.
Story Map

Step 2: Developing Stories Through Recorded Oral Rehearsal


How come I never thought of this!  Such a wonderful idea.  It really helped students remember and add so much more detail to their writing!  Second graders made short videos of themselves telling their stories using Glogster EDU.  They have worked with Glogster EDU independently so this went fairly quickly.  As always, we had a few technical difficulties, but overall it only took us a couple of days to get everyone recorded.  


Step 3: Listening, Critically Thinking and Conferring


After the children recorded their stories they listened to themselves and wrote their stories out on paper.  We finished this just before heading off for Spring Break.  Perfect timing if you ask me!  A week away from their stories did wonders for their editing.


Upon our return to school we worked on adding details with our writing partners.  Students practiced adding details through questioning.  A strategy taken from Mentor Texts: Teaching Writing Through Children's Literature, K-6 by Lynne R. Dorfman & Rose Cappelli.  As we continued to write we focused on word choice; thinking about making use of special vocabularies we have under our belts. Leads; making them more interesting using mentor texts.  And endings; working hard to compose satisfying endings for our audiences.


Throughout these lessons I continuously referred to our Writing Process chart to remind students that we can move back and forth through the process until we decide to finally publish for our intended audience.
This is the chart we use to remind ourselves of the writing process and how it works.
Narrative Project Checklist


Step 4: Creating Storyboards

Once students completed our checklist they were ready to create their storyboards.  Throughout the entire process I modeled each step with a story that I was writing along with them.  A few students had trouble deciding where their text should end for one slide and begin for the next.  A little extra 1:1 time in this department was helpful for them.


Here you can see students using their planning sheets to organize their stories.


Step 5: Creating Digital Stories

This was one of the most exciting parts of the entire process!  The kids loved recording themselves as well as listening to themselves reading aloud.  It has done wonders for their editing, fluency (expression & prosody) and self esteem.  We used Photo Story 3 which is a free download for PC's and super easy to use.  The video will work best if you make sure all the photos you use and the finished photo story are saved in the same file.  To avoid technical difficulties I went ahead and created each photo story on my computer rather than have the kids try to do it independently on their Mini Dells.  Next year I will start this process earlier in the year and hopefully have time to teach the kiddos how to upload their own photos and create a photo story independently.  I can't wait to get them all finished and published on our classroom website.  Here is a sample of one students finished product.  I uploaded the photo story to Youtube in order to embed it into my blog.

Wednesday, April 11, 2012

Dinosaurs, Dinosaurs, Dinosaurs!

     It is all about Dinosaurs this month in my second grade classroom.  Rawrrrrrrrrrrr!  Our unit began right after we returned from Spring Break.  I introduced the unit with a very sorry looking "egg" made out of a brown paper bag (I just can't bring myself to paper mache anymore).  Inside was a triceratops puppet.  We had done some inferring previously during our read alouds, but I think we need to keep working on that strategy (as you can see from some of their answers after each clue). 


The idea for this chart was inspired by one Deanna Jump posted on her blog.


     After discovering our unit of study we dove into it by reading Professor Potts' book, Uneversaurus.  This is an excellent book that explains how we know what dinosaurs looked like even though no human has ever seen one.  After reading the book we used our imaginations, bubble wrap, white butcher paper, sponge rollers and yellow, magenta, turquoise and black Crayola tempera paint to mix colors and create our own dinosaur skin.  The kids loved this!  We then traced one of three dinosaur patterns onto our skin to create our own version of a dinosaur.


     This week we are also learning about fossils and did a mini dinosaur dig in the classroom.  Again, my students LOVED this!  A couple of years ago I found a great replica of a T-Rex skeleton at Costco of all places.  I layered the "fossils" in a clear tote with potting soil and let these budding scientists have at it.  My class is small this year (15 cutie pies) and two were absent today so I broke them into 3 groups.  We had "diggers," "recorders," and "washers."  Each group rotated through each job.  In order to give everyone a chance to discover a fossil I had to stay on top of the rotation of the first two groups.  By the third group they were on their own.  I love standing back and watching kids discover and learn without me in the way.  The "washsers" started trying to figure out how to assemble the pieces.  They kept encouraging the "diggers" to keep digging for fossils they thought they still needed.  Then there was a whole conversation between the "recorders" about how archeologists don't always find all the bones they need to assemble the skeleton.


     It was pretty exciting...to say the least.  Stay tuned for more of our dino discoveries.


Friday, April 6, 2012

Smilebox

     I have been experimenting with various slideshow programs recently.  Here is a slideshow I made using Smilebox.  They give you a lot of choices with their free subscription.  I have also used Animoto and like it when I don't want to put very much text.  It took me about 5 minutes to make this slideshow.  Most of my time was spent choosing which photos I wanted to use.


Click to play this Smilebox slideshow
Create your own slideshow - Powered by Smilebox
A slideshow design by Smilebox

Sunday, April 1, 2012

Homemade Finger Paints

We have been on Spring Break this week and I have finally had some time to explore the homemade art recipes from the PreKinders Blog . On Thursday my 3 and 6 year old sons helped me make some homemade finger paints. We had a lot of fun and couldn't believe how cool the colors turned out!  Here are some pictures and some insights we had while making the paints.


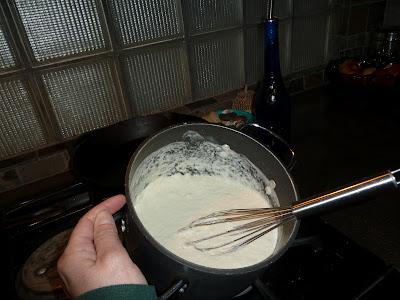
Here we are mixing the flour and cold water together.  It took a little time to get all the lumps out.


As the flour and water began to heat up on the stove it got pretty lumpy.  I thought I had ruined the recipe but it was just the beginning of the solution coming together to make a thick paste.  The recipe said to keep stirring until the paste became clear.  Eventually my arm got tired from stirring the thick paste so ours ended up opaque rather than clear.  

We divided up the paste and then did some color mixing with Schilling Neon Food Coloring.  The boys LOVED this part!


Here are the paints we made.  We had enough for 7 different colors, but I ran out of plastic containers.  I purchased the containers at the Dollar Tree and they came with lids which was handy.


Here are the artists at work and some of the finished products.  We painted on white construction paper and let our paintings dry over night.  The paper curled quite a bit on the paintings that had "thick" applications.  We put them under heavy books to flatten them out.  Next time we get the paints out we will paint on poster board.  The paints dry with a glossy sheen which we liked very much.  After 3 days the paints were still usable. 


Thursday, March 29, 2012

Thanks a Million!

I have a quote on my refrigerator uttered by Abraham Lincoln that says, "Whatever you are, be a good one."  I don't know how many times I have stood at my kitchen sink and read this thinking that he had no idea how many things a modern day woman would be trying to be "good at."  That the quote is noble, but unattainable.  And then a split second later I think, what a DUNCE!  Pull yourself together woman.  Your first world "problems" pale in comparison to what this man faced!  But, it was reading this quote on March 16th that put my Slice of Life posts on hiatus.  I stood in my p.j.'s at one o'clock in the morning staring at the fridge.  In that moment I realized that I was trying to do to much and was not being a "good one" in multiple departments.  My children were running amuck, my husband was starting to growl a little, my house was a mess and I was not rockin' it in the classroom.  I was tired and it showed.  My short lived adventure into this wonderful community of writer's was intoxicating and keeping me up way past my bedtime.  I had to make a choice.  I couldn't quite figure out how to be good at making my posts, reading posts (I could never just read 3!) and getting enough zzzzzzzzzz's.  I mentally boxed with myself  for a few days for being such a loser.  It was just 31 days right?  Eventually I admitted defeat and came to grips with the fact that I would not be able to continue the challenge.  I will spend some time trying to figure out what I can do differently next time, and hopefully, be a "good one" when it comes to the challenge next spring.  I learned so much and the experience has invigorated my teaching of writing in the classroom. A special thanks to all of you who shared your writing and encouraged me with your comments.


Photograph by Will, age 3

Thursday, March 15, 2012

Lost

     So I was standing in the hall today waiting for my son to get out of school.  All of a sudden a great lead to a story about sitting in the snow while my 3 year old napped in my lap in the middle of a ski run popped into my head.  I reached blindly into my purse and felt around for a pen.  Check.  Then I searched for a piece of paper.  I was sure there would be a pad of post-its in there somewhere.  Nope.  No post-its.  However, I did find my checkbook.  I pulled it out.  Nothing fancy.  Just the checks.  I flipped it over and scribbled down my thoughts.  When I was finished I looked up to see one of the other parents smiling at me.  "Paying bills?" she asked.  I giggled.  "No, just had a great idea for a story.  I didn't want to forget about it."  I dropped the checkbook back in my purse just as my son came bounding out of the classroom, all smiles.


     Hours later I sit here at my desk.  I have spent two hours cleaning my classroom and am ready to sit down and write my slice of life.  I walk over to my purse, open it and start digging around for my checkbook.  Oh yeah, I had taken it out to write a check for Eli's t-shirt.  Hmmmmm.  I find myself back at my desk.  No papers to shuffle through.  No checkbook.  No lead.  Bummer.

Tuesday, March 13, 2012

Ah ha! Momments

Ah ha! moments I have had since participating in the Slice of Life Writing Challenge.

1. Being part of a writing community is f-u-n, FUN!
2. Positive feedback from my peers inspires me to write again and again and again.
3. Sometimes I can't think of anything to write...until I read what somebody else has written.
4. Making personal connections to other peoples stories is cool.
5. Taking risks as a writer is exciting.
6. It is easier to teach and inspire young writer's when you walk the walk and talk the talk.

Monday, March 12, 2012

Second Grade Spelling Tools


     Second grade writer's need tools.  Practical tools.  When I am writing, whether it be an email, note to parents or my SOL I either have a dictionary handy or my web browser open and ready to search for that word whose spelling escapes me.  I try to point this out to my students regularly.  When I make a mistake or know I am not certain of a words spelling I bring it to my students attention and model how I go about fixing or learning from my mistake.  
     Here are a few of the tools I have found motivate and encourage second grade writer's to move past their fear of misspelling words (which seems to stop them dead in their tracks so many times!) and get down to the business of putting their incredible stories on the page.

1. I teach students to break the word into syllables and write one syllable at a time.  I also encourage them to write a word three different ways (using the different letter combinations they know for making the same sound) and choose the one that looks best.  I have a cute poster I made with these strategies on it to remind students to use them.  Of course it is on my work computer so I will have to post a link to it tomorrow.

2. I give students a form called "I'm not afraid of my words!" to keep in their writing folders.   When they have a big "juicy" word they are trying to spell they write it in the left hand column of their paper.  When I come to conference with them they show me any words they tried to spell and then I write the word correctly in the right hand column.  Afterword we discuss the smart things they did as a speller and the part they have to work on for next time.  I believe this is a Katie Wood Ray strategy.

3. An office.  Students can grab an "office" anytime they need one.  The office has the first 100 sight words they learned in first grade, long and short vowel sounds, beginning blends, word families and our second grade sight word/vocabulary word list which includes number words, days of the week and months of the year.  


What kind of spelling tools do you provide your students?